Today we will learn how to create OSGI Configuration Factory Service which can take the inputs from the osgi felix console as a service and serve your requirement.
Creating the project structure
Will create the project structure by using the archetypeVersion=10, make sure you have installed a java and maven setup configured in your OS and run the following command in command prompt.
mvn archetype:generate -DarchetypeGroupId=com.adobe.granite.archetypes -DarchetypeArtifactId=aem-project-archetype -DarchetypeVersion=10 -DarchetypeRepository=https://repo.adobe.com/nexus/content/groups/public/
As we are running the maven archtype in interactive mode it will ask you for the project structure details that are going to be created. I have used the following details for this example.
[INFO] Generating project in Interactive mode
[INFO] Archetype defined by properties
Define value for property ‘groupId’: : com.vardhan.example
Define value for property ‘artifactId’: : osgiexample
Define value for property ‘version’: 1.0-SNAPSHOT: : 0.1
Define value for property ‘package’: com.vardhan.example: : osgiexample
Define value for property ‘appsFolderName’: : osgiexample
Define value for property ‘artifactName’: : exampleosgi
Define value for property ‘componentGroupName’: : VARDHAN
Define value for property ‘contentFolderName’: : osgiexample
Define value for property ‘cssId’: : osgiexample
Define value for property ‘packageGroup’: : osgiexample
Define value for property ‘siteName’: : osgiexample
Confirm properties configuration:
groupId: com.vardhan.example
artifactId: osgiexample
version: 0.1
package: osgiexample
appsFolderName: osgiexample
artifactName: exampleosgi
componentGroupName: VARDHAN
contentFolderName: osgiexample
cssId: osgiexample
packageGroup: osgiexample
siteName: osgiexample
Y: : y — (prompt for the confirmation provide y to confirm)
[INFO] ——————————————————————–
[INFO] Using following parameters for creating project from Archetype: aem-project-archetype:10 …… …
…………
[INFO] BUILD SUCCESS
once the build is success your project structure will be created, as shown below.

Once the structure has been created successfully change directory in command prompt where the project pom.xml is located. (here my project folder created is osgiexample so i am using below “cd osgiexample”) from where we have to run maven commands.
E:\osgiconfigexample>cd osgiexample
Creating the Service and its Implementation
- create a folder named “services” under core as shown below path.
\osgiexample\core\src\main\java\osgiexample\core\services
- Declaring the Service interface.You can create a simple service as shown below which has only one getData() method declared.
package osgiexample.core.services;
public interface VarService {
public String getData();
}
Once you have the service interface created, we are going to create our service implementation class, for that am going to create another folder called “serviceimpl” under “core” folder
\osgiexample\core\src\main\java\osgiexample-package\core\serviceimpl
- Creating Service implementation.
You can create a VarServiceImpl class as shown below which has getData() implementation and @Activate and @Modified methods initiating your variables.
and below is the implementation class code i have written
package osgiexample.core.serviceimpl;
import org.apache.felix.scr.annotations.Reference;
import org.apache.felix.scr.annotations.Component;
…..
import osgiexample.core.services.VarService;
@Component(immediate=true, label=”VARDHAN Service”, description=”Hello There – This is a Service component”, configurationFactory = true, metatype=true)
@Service(value=VarService.class)
public class VarServiceImpl implements VarService {
/** this property is used to get input from OSGI felix console **/
@Property(description=”This is Label for Varservice”)
private static final String SERVICE_LABEL = “service.label”;
/** this property is used to identify the exact config from config Factory services **/
@Property(description=”This is Config input to test”, value=”Hello There – this is property value”)
static final String SERVICE_VARIABLE = “service.variable”;
private String serviceVariable;
/** this getData() method is used to give result to the caller **/
@Override
public String getData() {
return “Return data from Service:” + this.serviceVariable;
}
/** this Activate method is used to initiate the variable when osgi activate status **/
@Activate
protected void activate (ComponentContext ctx) {
this.serviceVariable = PropertiesUtil.toString(ctx.getProperties().get(SERVICE_VARIABLE),SERVICE_VARIABLE);
}
/** this Modified method is used to load the variable when the osgi modified status**/
@Modified
protected void modified (ComponentContext ctx) {
this.serviceVariable = PropertiesUtil.toString(ctx.getProperties().get(SERVICE_VARIABLE),SERVICE_VARIABLE);
}
}
To build and deploy the above code let’s run the below command here i am skipping the Tests as I didn’t wrote any by passing –DskipTests parameter.
” mvn clean install -DskipTests –PautoInstallPackage “
Once your maven command has build success result you can see that the code and its package has been deployed to your local author instance (hoping your author is running at localhost:4502)
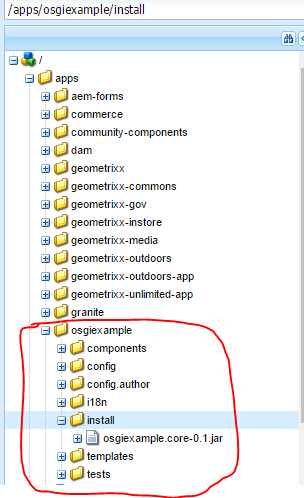
Verify your bundle status and the Factory configuration service availability
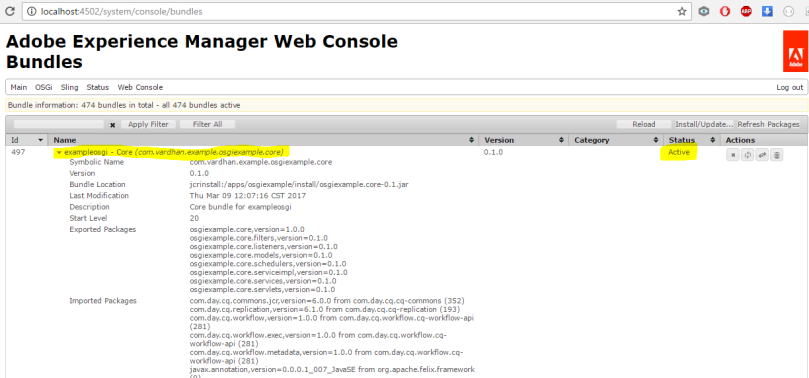
- Bundle verification : Open OSGI Felix bundles console verify the bundle active status, http://localhost:4502/system/console/bundle
- Configuration Factory Service verification : open the OSGI configuration console url and verify the service factory configuration is available. http://localhost:4502/system/console/configMgr

in the above code snippet @Component annotation has “configurationFactory = true” which makes you the magic of the Service to make as Factory.
Now let’s create two service configurations from factory which can be consumed by servlet that we are going to write next.
Configuration 1:
Remember here that I have given a property label(service.label) value as “MYSERVICE” which I am going use in servlet to consume the same configuration.

Configuration 2:

Write a Servlet that can be used to consume the configuration.
Am going to create another folder called “servlets” under “core” folder
\osgiexample\core\src\main\java\osgiexample-package\core\servlets
The OSGI servlet is as shown below.
package osgiexample.core.servlets;
import java.io.IOException; ….
import osgiexample.core.services.VarService;
@SuppressWarnings(“serial”)
@SlingServlet(paths=”/services/aemvardhan/callservice“, methods=”GET”)
public class VarServiceServlet extends SlingAllMethodsServlet{
/** This Reference with target parameter will directly points to the service which has the service.label as MYSERVICE**/
@Reference(target = “(service.label=MYSERVICE)”)
VarService varService;
/** doGet method to call the service and get the response back to the request **/
@Override
protected void doGet(SlingHttpServletRequest request,
SlingHttpServletResponse response) throws ServletException,
IOException {
response.getWriter().write(varService.getData());
}}
In the above code the @SlingServlet paths=”/services/aemvardhan/callservice” is the name by which we are going to call the Servlet which internally calls the varService.getData(). by using below code snippet.
@Reference(target = “(service.label=MYSERVICE)”)
VarService varService;
Now lets build and deploy the code again run the below command again or you can deploy only bundle to felix container (Or you can deploy only the bundle alone to felix container).
mvn clean install -DskipTests –PautoInstallPackage
After the deployment once your bundle is in Active status. Just call your servlet by the below url.
http://localhost:4502/services/aemvardhan/callservice
which should return you the configuration data (as shown in the above configuration1 image) as our servlet is referenced to that config by @Reference(target = “(service.label=MYSERVICE)”) .

You can change the Servlet @Reference target label to bring out the data from the config which ever you like.
” Note that without the target i.e. only with @Reference annotation the data binding will be random so if you want to to test it change the servlet and give a try.”
Crackers that has to be ready to handle 🙂
Check your bundle if it shows any error of the javax.inject version mismatch as shown below.
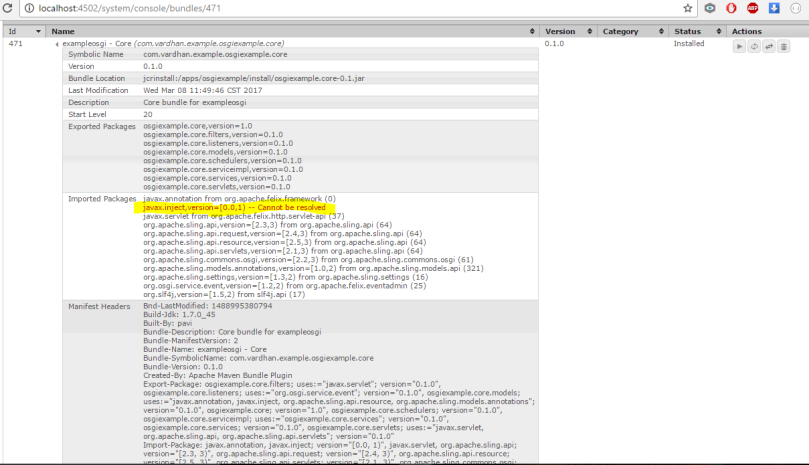
Try to add the below import tags in your core pom.xml file.
<Import-Package>
javax.inject;version=0.0.0,com.day.cq.replication;version=”[6.0.0,7)”,
org.apache.sling.event.jobs;version=”[1.5,2]”,
com.day.cq.workflow;version=”[1.0,2)”,
com.day.cq.workflow.exec;version=”[1.0,2)”,
com.day.cq.workflow.metadata;version=”[1.0,2)”,
org.apache.sling.models.annotations;version=”[1.1,2)”,
com.day.cq.commons.jcr;version=”[5.7.0,7.0.0)”,
*</Import-Package>
As shown in below image you can add the above <Import-Package> tag
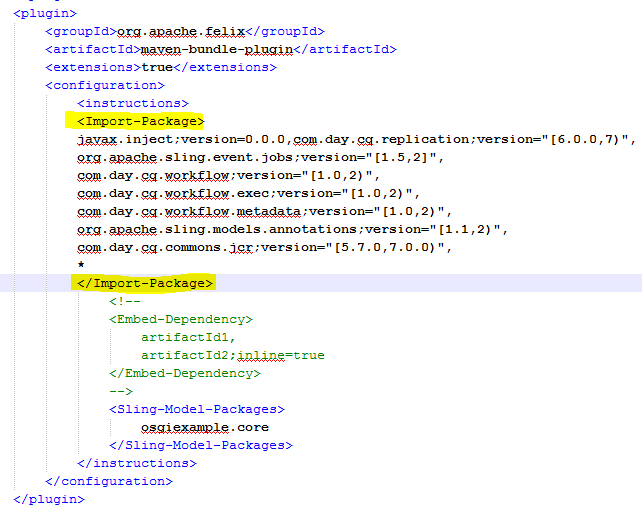
run the maven command and redeploy the package/bundle after fixing the javax.inject error in bundle.
Tit Bits 🙂
Beauty of the sling and OSGI is you just need to create the Factory ID related sling:OsgiConfig node in your project config folder, with appended with your custom name and add the properties,that will reflect in Felix console as shown below.
/apps/osgiexample/config/osgiexample.core.serviceimpl.VarServiceImpl-osgiexampletest
![]()
Happy learning. 🙂
