Understand AEM Sling Resource Merger, Override and Overlay concepts

Overlay:

When you overlay a component in AEM means that copy component from /libs/ folder to /apps/.. folder. And you can impose your own definitions(like change title,group,business logic functionalities) on the newly copied components under /apps/..

As per the default OSGI preferences AEM uses a search path to find a resource, searching first the /apps/ branch and then the /libs branch so your newly copied components under /apps/ gets priority than the /libs/.

Note that we can modify search paths and its priority order by changing it from the Felix console Apache Sling Resource Resolver Factory configurations.

You can try overlaying these libs/foundation/components/ list, image, Text&Image, Carousel, etc,. simple components to play around and change the dialogs, jsp level functionalities and see the behaviour. When you are overlaying a component remember that both components can show up in the authors sidekick, For your overlay /apps/.. component , if the title, componentGroups are the same as /libs/.. component, in design mode of the parsys to enable component can distinguish them with parenthesis around the component (foundation) vs (your project).

overlay.png

Override:

You can extend/override Component behaviour by using sling:resourceSuperType property.

Creating a custom component manually by creating all necessary nodes and setting value of sling:superResourceType property to that component will inherit all the feature from /libs/ component, even after upgrade you still inherit the features of image component.

Here we can use the sling:superResourceType for any component that you want to inherit functionality (example from projectA component to ProjectB etc., not only restricted to libs). There is a usage difference for the overlay from AEM 6.0 versions onwards as the new Granite Touch UI has been introduced, have a look at Adobe Documentation

AdobeDocumentation.png

Sling Resource Merger:

Have look at the Sling Resource Merger for understanding the Resource Merger bundle concept. It’s a Sling framework bundle (org.apache.sling.resourcemerger) which gives you flexibility to have merged view on multiple other resources. The exact merging mechanism depends on the resource picker implementation (i.e. Overlay or Override).

By this Sling Resource Merger It is possible to

  1. remove existing resource/properties from the underlying resources,
  2. modify existing properties/child resources of the underlying resources and
  3. add new properties/child resources

The resource merger provides the following properties to achieve the above

  1. sling:hideProperties (String or String[]) — Specifies the property, or list of properties, to hide.The wildcard * hides all.
  2. sling:hideResource (Boolean) — Indicates whether the resources should be completely hidden, including its children.
  3. sling:hideChildren (String or String[]) — Contains the child node, or list of child nodes, to hide. The properties of the node will be maintained. The wildcard * hides all.
  4. sling:orderBefore (String) — Contains the name of the sibling node that the current node should be positioned in front of.

AEM default installation you will have this bundle available the same can be verified from your Felix console with bundle symbolic name org.apache.sling.resourcemerger

The goals for using the Sling Resource Merger in AEM are to:

  1. ensure that customization changes are not made in /libs.
  2. reduce the structure that is replicated from /libs.

Let’s go to an AEM example to implement or utilize it

Currently am going to overlay the Tools related node jcr:title value which is under /libs/ to /apps

Tools.png

componentoverlay.png

componentdialog.png

Now update the jcr:title property alone on the overlay component node property which is under /apps/.. 

updatejcrtitle.png

VerifyJcrTitle.png

Like this you can overlay any component from libs and update the required functionality changes to that particular nodes.

Let’s see one more example usage of sling Resource Merger property

Here as shown above I have overlayed the sites node also along with the jcr:title property I have added the sling:hideProperties as shown below.

slinghideproperty.png

Now look at the output of the sites title in the touch UI page navigation make sure you handle null in presentation layer.

slinghideverify.png

Similar way you can play with other properties as well.

~ Enjoy learning and help others.

Got Bored of Localhost?

Here is small tip for changing the localhost to your wish name.

  1. Go to C:\Windows\System32\drivers\etc folder and find the the file named “hosts” (it might required admin preveleges to edit this file).
  2. Add entries of your like name as the domain names as shown below example.hostsfileedit
  3. Access the project via the domain name (Example: vardhanlocal.com/content/..) as shown in the below screenshot. Your pages should be render as below.vardhanlocal


Hide content path from AEM publish page access

Just as simple as add a sling mapping node as shown below in your publisher instance etc maps. Use the sling:internalRedirect mechanism for end page access.

Node name : localhost.4503
jcr:primaryType : sling:Mapping
sling:internalRedirect  String[]  /content/, /

slinginternalredirect.JPG

After that you can access your default pages with out a content in the url path. as shown below.

http://localhost:4503/geometrixx-outdoors/en/men/coats.html

pageacess.JPG

How to Create AEM OSGI Configuration Factory Service ?

Today we will learn how to create OSGI Configuration Factory Service which can take the inputs from the osgi felix console as a service and serve your requirement.

Creating the project structure

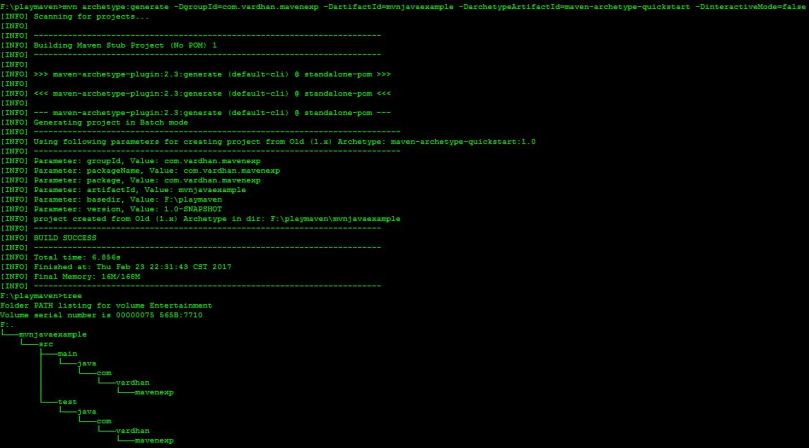
Will create the project structure by using the archetypeVersion=10, make sure you have installed a java and maven setup configured in your OS and run the following command in command prompt.

mvn archetype:generate -DarchetypeGroupId=com.adobe.granite.archetypes -DarchetypeArtifactId=aem-project-archetype -DarchetypeVersion=10 -DarchetypeRepository=https://repo.adobe.com/nexus/content/groups/public/

As we are running the maven archtype in interactive mode it will ask you for the project structure details that are going to be created. I have used the following details for this example.

[INFO] Generating project in Interactive mode
[INFO] Archetype defined by properties
Define value for property ‘groupId’: : com.vardhan.example
Define value for property ‘artifactId’: : osgiexample
Define value for property ‘version’:  1.0-SNAPSHOT: : 0.1
Define value for property ‘package’:  com.vardhan.example: : osgiexample
Define value for property ‘appsFolderName’: : osgiexample
Define value for property ‘artifactName’: : exampleosgi
Define value for property ‘componentGroupName’: : VARDHAN
Define value for property ‘contentFolderName’: : osgiexample
Define value for property ‘cssId’: : osgiexample
Define value for property ‘packageGroup’: : osgiexample
Define value for property ‘siteName’: : osgiexample
Confirm properties configuration:
groupId: com.vardhan.example
artifactId: osgiexample
version: 0.1
package: osgiexample
appsFolderName: osgiexample
artifactName: exampleosgi
componentGroupName: VARDHAN
contentFolderName: osgiexample
cssId: osgiexample
packageGroup: osgiexample
siteName: osgiexample
 Y: : y  — (prompt for the confirmation provide y to confirm)
[INFO] ——————————————————————–
[INFO] Using following parameters for creating project from Archetype: aem-project-archetype:10 …… …

…………

[INFO] BUILD SUCCESS


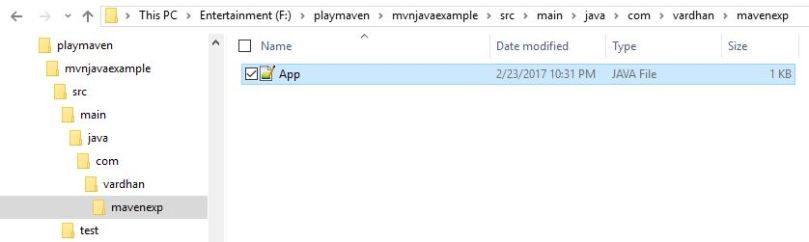
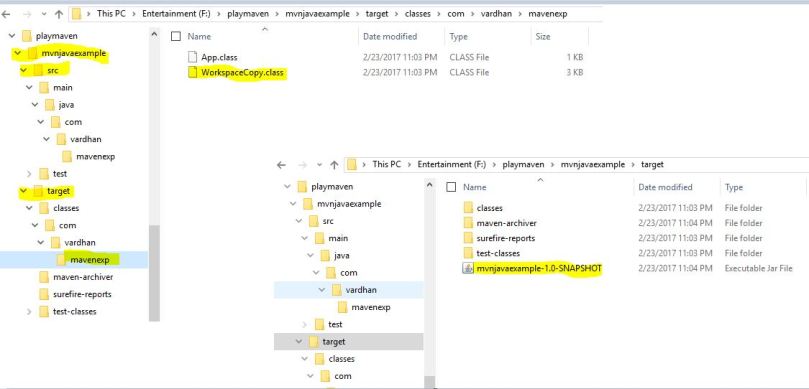
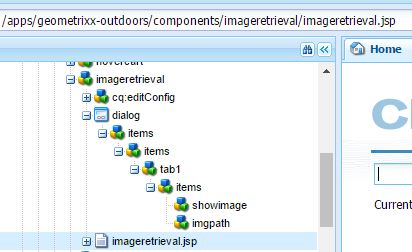
once the build is success your project structure will be created, as shown below.

proj-structure.png

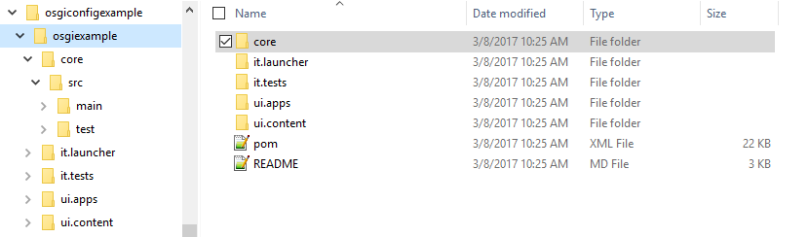
Once the structure has been created successfully change directory in command prompt where the project pom.xml is located. (here my project folder created is osgiexample so i am using below “cd osgiexample”) from where we have to run maven commands.

E:\osgiconfigexample>cd osgiexample

Creating the Service and its Implementation

  • create a folder named “services” under core as shown below path.

\osgiexample\core\src\main\java\osgiexample\core\services

  • Declaring the Service interface.You can create a simple service as shown below which has only one getData() method declared. 

    package osgiexample.core.services;
        public interface VarService {
             public String getData();
           }

Once you have the service interface created, we are going to create our service implementation class, for that am going to create another folder called “serviceimpl” under “core” folder


\osgiexample\core\src\main\java\osgiexample-package\core\serviceimpl


  • Creating Service  implementation.

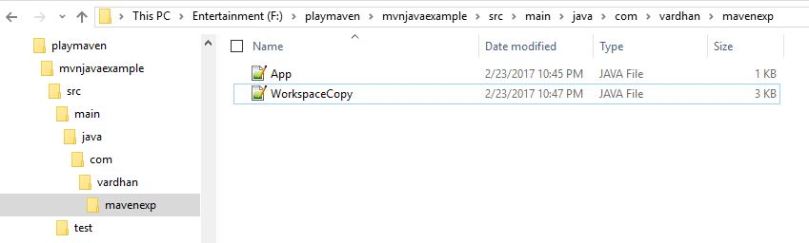
You can create a VarServiceImpl  class as shown below which has getData() implementation and @Activate and @Modified methods initiating your variables.

and below is the implementation class code i have written
package osgiexample.core.serviceimpl;

import org.apache.felix.scr.annotations.Reference;
import org.apache.felix.scr.annotations.Component;
…..
import osgiexample.core.services.VarService;

@Component(immediate=true, label=”VARDHAN Service”, description=”Hello There – This is a Service component”, configurationFactory = true, metatype=true)
@Service(value=VarService.class)

public class VarServiceImpl implements VarService {

/** this property is used to get input from OSGI felix console **/
@Property(description=”This is Label for Varservice”)
private static final String SERVICE_LABEL = “service.label”;

/** this property is used to identify the exact config from config Factory services **/
@Property(description=”This is Config input to test”, value=”Hello There – this is property value”)
static final String SERVICE_VARIABLE = “service.variable”;

private String serviceVariable;

/** this getData() method is used to give result to the caller **/
@Override
public String getData() {
return “Return data from Service:” + this.serviceVariable;
}

/** this Activate method is used to initiate the variable when osgi activate status **/
@Activate
protected void activate (ComponentContext ctx) {
this.serviceVariable = PropertiesUtil.toString(ctx.getProperties().get(SERVICE_VARIABLE),SERVICE_VARIABLE);
}

/** this Modified method is used to load the variable when the osgi modified status**/
@Modified
protected void modified (ComponentContext ctx) {
this.serviceVariable = PropertiesUtil.toString(ctx.getProperties().get(SERVICE_VARIABLE),SERVICE_VARIABLE);
}
}

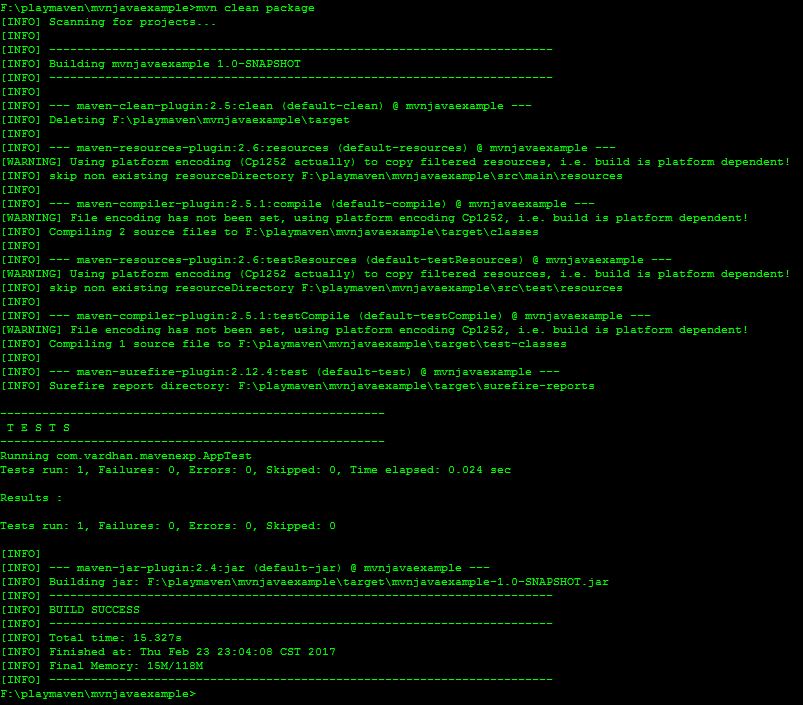
To build and deploy the above code let’s run the below command here i am skipping the Tests as I didn’t wrote any by passing –DskipTests parameter.

          ”   mvn clean install -DskipTests –PautoInstallPackage “

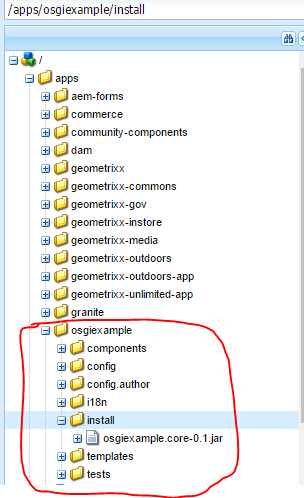
Once your maven command has build success result you can see that the code and its package has been deployed to your local author instance (hoping your author is running at localhost:4502)

apps.png

Verify your bundle status and the Factory configuration service availability

  1. Bundle verification : Open OSGI Felix bundles console verify the bundle active status, http://localhost:4502/system/console/bundleBundle.PNG
  2. Configuration Factory Service verification : open the OSGI configuration console url and verify the service factory configuration is available. http://localhost:4502/system/console/configMgr

config.PNG

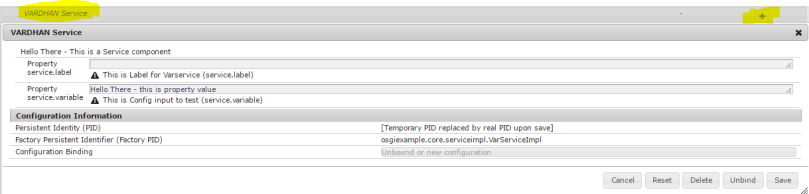
in the above code snippet @Component annotation has “configurationFactory = true” which makes you the magic of the Service to make as Factory.

Now let’s create two service configurations from factory which can be consumed by servlet that we are going to write next.
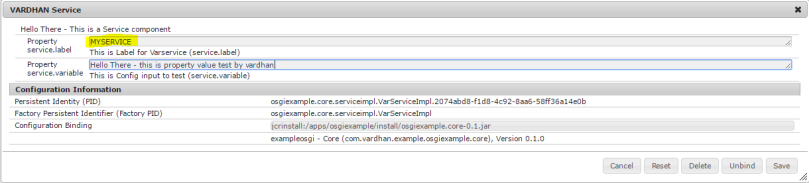
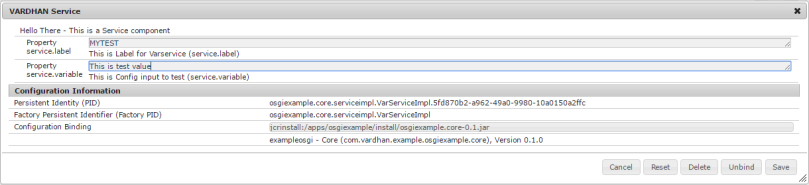
Configuration 1:

Remember here that I have given a property label(service.label) value as “MYSERVICE” which I am going use in servlet to consume the same configuration.

config1.png

Configuration 2:

config2.png

Write a Servlet that can be used to consume the configuration.

Am going to create another folder called “servlets” under “core” folder

\osgiexample\core\src\main\java\osgiexample-package\core\servlets

The OSGI servlet is as shown below.

package osgiexample.core.servlets;

import java.io.IOException;  ….
import osgiexample.core.services.VarService;

@SuppressWarnings(“serial”)
@SlingServlet(paths=”/services/aemvardhan/callservice“, methods=”GET”)
public class VarServiceServlet extends SlingAllMethodsServlet{

/** This Reference with target parameter will directly points to the service which has the service.label as MYSERVICE**/
@Reference(target = “(service.label=MYSERVICE)”)
VarService varService;

/** doGet method to call the service and get the response back to the request **/
@Override
protected void doGet(SlingHttpServletRequest request,
SlingHttpServletResponse response) throws ServletException,
IOException {
response.getWriter().write(varService.getData());
}}

In the above code the @SlingServlet  paths=”/services/aemvardhan/callservice” is the name by which we are going to call the Servlet which internally calls the varService.getData(). by using below code snippet.

@Reference(target = “(service.label=MYSERVICE)”)
VarService varService;

Now lets build and deploy the code again run the below command again or you can deploy only bundle to felix container (Or you can deploy only the bundle alone to felix container).

         mvn clean install -DskipTests –PautoInstallPackage 

After the deployment once your bundle is in Active status. Just call your servlet by the below url.

http://localhost:4502/services/aemvardhan/callservice

which should return you the configuration data (as shown in the above configuration1 image) as our servlet is referenced to that config by @Reference(target = “(service.label=MYSERVICE)”) .

servlet call.png

You can change the Servlet @Reference target label to bring out the data from the config which ever you like.

” Note that without the target i.e. only with @Reference annotation the data binding will be random so if you want to to test it change the servlet and give a try.”

Crackers that has to be ready to handle 🙂

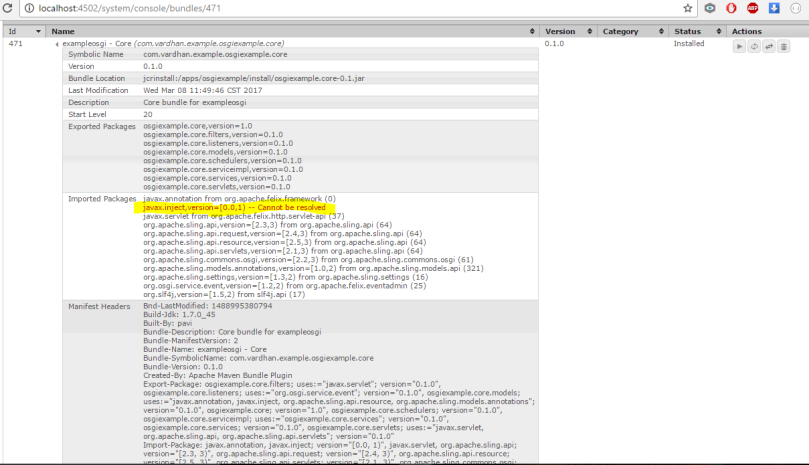
Check your bundle if it shows any error of the javax.inject version mismatch as shown below.

error.png

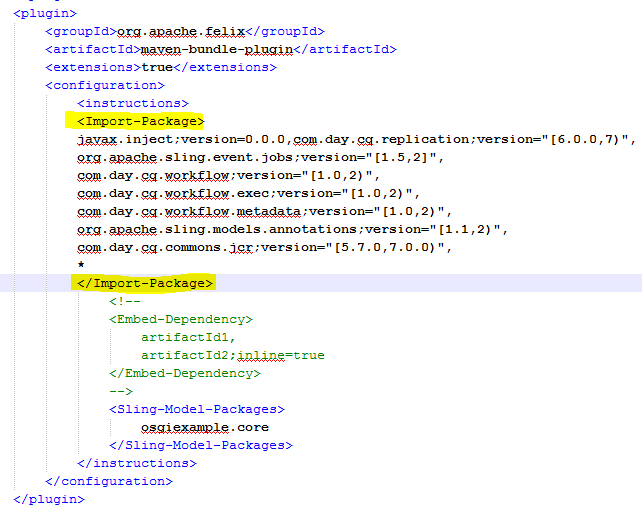
Try to add the below import tags in your core pom.xml file.
<Import-Package>
javax.inject;version=0.0.0,com.day.cq.replication;version=”[6.0.0,7)”,
org.apache.sling.event.jobs;version=”[1.5,2]”,
com.day.cq.workflow;version=”[1.0,2)”,
com.day.cq.workflow.exec;version=”[1.0,2)”,
com.day.cq.workflow.metadata;version=”[1.0,2)”,
org.apache.sling.models.annotations;version=”[1.1,2)”,
com.day.cq.commons.jcr;version=”[5.7.0,7.0.0)”,
*</Import-Package>

As shown in below image you can add the above <Import-Package> tag

importtag.png

run the maven command and redeploy the package/bundle after fixing the javax.inject error in bundle.

Tit Bits 🙂

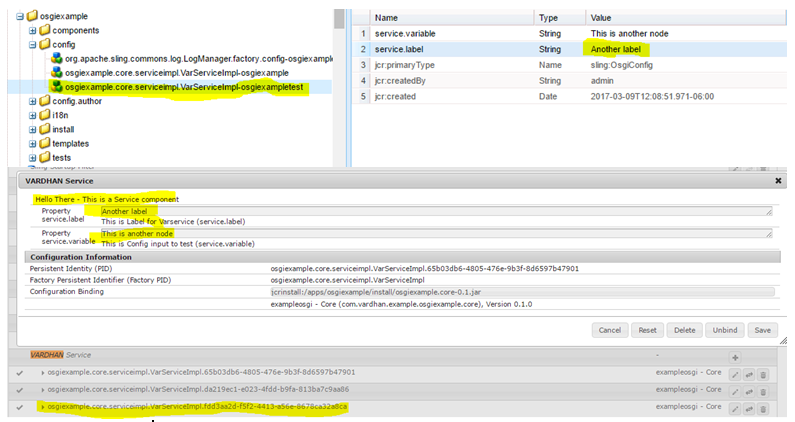
Beauty of the sling and OSGI is you just need to create the Factory ID related sling:OsgiConfig node in your project config folder, with appended with your custom name and add the properties,that will reflect in Felix console as shown below.

/apps/osgiexample/config/osgiexample.core.serviceimpl.VarServiceImpl-osgiexampletest

osgiconfig.PNG

Happy learning.  🙂


How to use AEM Desktop

Today we will see How to use the AEM Desktop

Download AEM Desktop

Download the AEM Destop compatible to your operating system from the Adobe website

https://helpx.adobe.com/experience-manager/kb/download-companion-app.html

Install the app with default settings, once installed, open the app which asks for the credentials. as shown below. here am connecting to localhost:4502 you can change according to your instance.

aemdesktop-credentials.png

Once the connection established you will be able to see the notification as shown below.

connection-success.png

Verify the Connection Alive status

And the same can be confirmed by mouse hover on the AEM desktop Icon

connection-verify.png

Where the connection mapped into your local instance ?

The connection will be established with your server and port to the Content path of DAM I have connected to my local instance and it connection has been established as (X:) drive which can be figured out as ThisPC > dam (\\127.0.0.1@63199\DavWWWRoot\content)

drive.png

How to Explore Assets in your local mapped drive .?

You can click on the windows popup icon and select Explore Assets option as shown below.

explore-assets.png

Play with Assets which automatically sync to your AEM

Here I have created a test folder for the dam asset sync test as shown below and you can see that it has synced with Local AEM server Assets.

work-assets.png

Verify the DAM sync from your AEM dam admin url.

DAM-Sync.png


How to Copy AEM node tree in JCR/CRX

Here i am going to explain how to create a maven project which can be used to connect your Local AEM instance and play with content.

  1. Step1 : Create a maven project structure
  2. Step2: Create a JAVA class that can be used to connect with your local AEM instance
  3. Step3: Update pom.xml file for adding the dependencies and profile.
  4. Step4: Compile/package your code by maven command
  5. Step5: Run your Compiled java class to test the connectivity and the JCR operations of workspace copy.

Step1: Create a maven project structure.

mvn archetype:generate -DgroupId=com.vardhan.mavenexp -DartifactId=mvnjavaexample -DarchetypeArtifactId=maven-archetype-quickstart -DinteractiveMode=false

here i have used a simple maven quickstart archetype to generate a folder structure for my project once i execute the above command it will create the following folder structure.

mavencreate.JPG

folderstructure.JPG

Step2: Create a JAVA class that can be used to connect with your local AEM instance.

you can rename the App.java file to your wish name and place the below code into that new/renamed java file. (Here i have created additional new file named WorkspaceCopyTest.java which contains the below code)

package com.vardhan.mavenexp;

/**
* A simple JCR play Class
*/

import javax.jcr.Repository;
import javax.jcr.Session;
import javax.jcr.SimpleCredentials;
import javax.jcr.Node;
import javax.jcr.Workspace;
import org.apache.jackrabbit.commons.JcrUtils;
import org.apache.jackrabbit.core.TransientRepository;
import javax.jcr.NodeIterator;

public class WorkspaceCopy {

public static void main(String[] args) throws Exception {

try {

//Create a connection to the CQ repository running on local host
Repository repository = JcrUtils.getRepository(“http://localhost:4502/crx/server&#8221;);

//Create a Session
//javax.jcr.Session session = repository.login( new SimpleCredentials(“admin”, “admin”.toCharArray()));
String WORKSPACE = “crx.default”;
javax.jcr.Session session = repository.login(new SimpleCredentials(“admin”, “admin”.toCharArray()), WORKSPACE);
Workspace workspace = session.getWorkspace();
Node root = session.getRootNode();
// Source and Destination paths
Node srcnodepath = root.getNode(“./content/dam/geometrixx/portraits”);
Node destnode = root.getNode(“./content/dam/geometrixx/test/”);

if (srcnodepath.hasNodes()) {
NodeIterator worknodes = srcnodepath.getNodes();
while (worknodes.hasNext()) {
Node childnde = worknodes.nextNode();
// formation of destination path and its relative path variables
String[] parts = childnde.getPath().split(“/”);
String destrelativepath = parts[((parts.length) – 1)];
String destpath = destnode.getPath() + “/” + parts[((parts.length) – 1)];
// calling validate destination method to verify if destination path already exist then will not create node again.
if (validatedestpath(destnode, destrelativepath)) {
workspace.copy(childnde.getPath(), destpath);
}
}
}
System.out.println(“:::Hurray workspace copy completed:::”);
session.logout();
} catch (Exception e) {
e.printStackTrace();
}
}
static Boolean validatedestpath(Node destnode, String destrelativepath) {
try {
if (destnode.hasNode(destrelativepath)) {
return false;
}
} catch (Exception e) {
e.printStackTrace();
}
return true;
}
}


workspacecopy.JPG

Step3: Update pom.xml file for adding the dependencies and profile.

open the pom.xml file and update it as shown below. here i have added JCR dependencies as well as one profile to call main class in install phase.

<project xmlns=”http://maven.apache.org/POM/4.0.0&#8243; xmlns:xsi=”http://www.w3.org/2001/XMLSchema-instance&#8221;
xsi:schemaLocation=”http://maven.apache.org/POM/4.0.0 http://maven.apache.org/maven-v4_0_0.xsd”&gt;
<modelVersion>4.0.0</modelVersion>
<groupId>com.vardhan.mavenexp</groupId>
<artifactId>mvnjavaexample</artifactId>
<packaging>jar</packaging>
<version>1.0-SNAPSHOT</version>
<name>mvnjavaexample</name>
<url>http://maven.apache.org</url&gt;
<dependencies>
<dependency>
<groupId>junit</groupId>
<artifactId>junit</artifactId>
<version>3.8.1</version>
<scope>test</scope>
</dependency>
<dependency>
<groupId>javax.jcr</groupId>
<artifactId>jcr</artifactId>
<version>2.0</version>
</dependency>

<!– https://mvnrepository.com/artifact/org.apache.jackrabbit/jackrabbit-jcr-commons –>
<dependency>
<groupId>org.apache.jackrabbit</groupId>
<artifactId>jackrabbit-jcr-commons</artifactId>
<version>2.2.0</version>
</dependency>
<!– https://mvnrepository.com/artifact/org.apache.jackrabbit/jackrabbit-core –>
<dependency>
<groupId>org.apache.jackrabbit</groupId>
<artifactId>jackrabbit-core</artifactId>
<version>2.14.0</version>
</dependency>
<!– https://mvnrepository.com/artifact/org.apache.jackrabbit/jackrabbit-jcr2dav –>
<dependency>
<groupId>org.apache.jackrabbit</groupId>
<artifactId>jackrabbit-jcr2dav</artifactId>
<version>2.14.0</version>
</dependency>

<!– The SFL4J logging implementation you prefer –>
<dependency>
<groupId>org.slf4j</groupId>
<artifactId>slf4j-simple</artifactId>
<version>1.7.21</version>
</dependency>
</dependencies>
<profiles>
<profile>
<id>vardhan-mvnjava</id>
<build>
<plugins>
<plugin>
<groupId>org.codehaus.mojo</groupId>
<artifactId>exec-maven-plugin</artifactId>
<version>1.1.1</version>
<executions>
<execution>
<phase>install</phase>
<goals>
<goal>java</goal>
</goals>
<configuration>
<mainClass>com.vardhan.mavenexp.WorkspaceCopy</mainClass>
<arguments>
<argument>arg0</argument>
<argument>arg1</argument>
</arguments>
</configuration>
</execution>
</executions>
</plugin>
</plugins>
</build>
</profile>
</profiles>

</project>

Step4: Compile/package your code by maven command.

mvn clean package

Use the above command at mvnjavaexample folder where your pom.xml file exists.

it might take some time for the first time build to download the dependencies, make sure you are not behind the proxy else you need to setup your maven to use proxy settings.

buildsuccess.JPG

you can verify in the compiled classes and a jar build with your classes inside target folder.classes.JPG

Step5: Run your Compiled java class to test the connectivity to local instance and the JCR workspace copy operation.

Now its time to run the class and see if our code snippet works fine.

In this code i have taken source path as /content/dam/geometrixx/portraits which contains some images as shown below and destination path as /content/dam/geometrixx/test/ which is an empty folder.

damfolders.JPG

Now lets run the below maven command to call our WorkspaceCopy class and execute the workspace.copy operation between the source path and destination path.

mvn exec:java -Dexec.mainClass=”com.vardhan.mavenexp.WorkspaceCopy

runsuccess.JPG

once you got the success message in your command prompt you should be able to see the nodes got copied to your test folder.

nodecreated.JPG

You can test the code by deleting any nodes under test and re run the above maven command which will recreate the deleted nodes again.

The same class can also be called by using the maven profile created in our pom.xml file with the below command.

mvn install -Pvardhan-mvnjava

The Help sample has been created and executed with below versions of dependencies.

Maven Version: apache-maven-3.1.1
Java version: 1.7.0_45
AEM Version: 6.2

Simple DAM Image retrieval Example

  1. Create a component named imageretrieval by right clicking on any project (here am taking a geometrixx-outdoors project as my project)
  2. Create a dialog as shown below node structure.imagedialog.pngimagedialogjson.png
  3. the dialog finally results as shown belowimagepagedialog.png
  4. imageretrieval.jsp code snippet (have added both scriptlet and JSTL way of retrieving)

    <%–
    image retrieval component.
    –%>
    <%
    %><%@include file=”/libs/foundation/global.jsp”%><%
    %><%@page session=”false” %><%
    %>
    <b>::This is simple test to hide/show image from dialog box::</b>

    <!– JSP Scriplet Style of retrieval –>
    <%
    boolean isChecked = properties.get(“showimage”, false);
    String imgpath = properties.get(“imgpath”, “”);
    //out.println(isChecked);
    //out.println(imgpath);
    //write the scriplet code if conditions for retrieval of dialog values and display image in page
    %>

    <!– JSTL code which displays the image based on the dialog selection –>
    </br>
    <c:if test=”${properties.showimage}”>
    <c:if test=”${not empty properties.imgpath}”>
    <img src=’${properties.imgpath}’ alt=”Smiley face” width=”100″ height=”100″>
    </c:if>
    </c:if>

  5. Finally drag and drop the component into any geometrixx-outdoors page and edit the dialog to see the functionality resultimagepage.png


AEM Vault (VLT) Tool SETUP

  • Go to the running AEM instance quickstart/opt/filevault folder copy the respective vlt file related to your OS.

  • Paste in outside of your quickstart folder
  • Extract the zip file

  • Add the Vault home directory path into your system environment variables path settings as shown below. (if any other OS you can add to their respective path variables) and save.